宅哥聊构架 工具
2022-07-08
宅哥聊构架 工具
2022-07-08
在音视频播放的场景中,用户的网速是影响体验的重要因素,播放器在播放的过程中,可以计算单位时间获取的数据量来衡量网速。flv.js的实例提供了statistics_info事件获取当前的网速。
flvPlayer.on('statistics_info', function(res) {
    console.log('statistics_info',res);
})
res结构如下:
{
    currentSegmentIndex: 0,
    decodedFrames: 15,
    droppedFrames: 0,
    hasRedirect: false,
    loaderType: "fetch-stream-loader",
    playerType: "FlvPlayer",
    speed: 395.19075278358656,
    totalSegmentCount: 1,
    url: "https:/example.com/1.flv"
}
其中的speed字段就是网速,单位是KB/s, 下面就看关于网速计算相关的部分。statistics_info事件中获取网速的整体流程如下图:
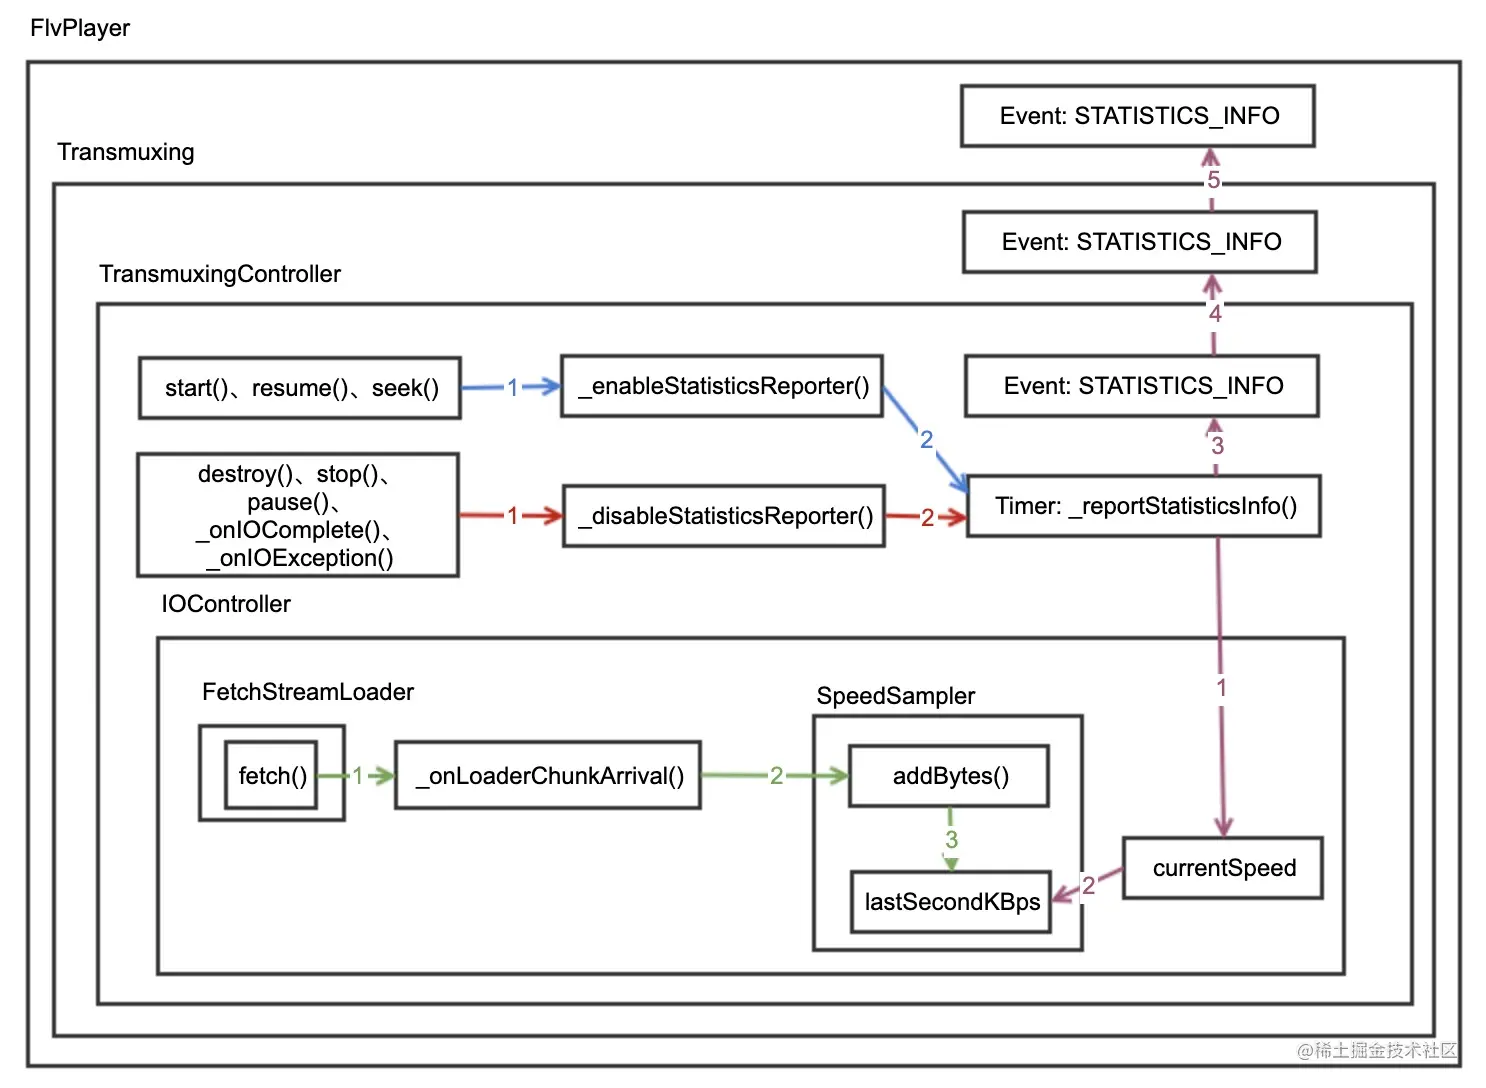
IOController中控制每次把加载的字节数添加到SpeedSampler中,对外提供的lastSecondKBps属性是最近有数据一秒的网速。
TransmuxingController中控制播放器在加载数据的时候开启定时器获取统计数据,向上触发事件。
核心的计算还是SpeedSampler类, lastSecondKBps是getter属性获取最近有数据一秒的网速,代码含义参考注释。
 get lastSecondKBps () {
    // 如果够1s计算 this._lastSecondBytes
    this.addBytes(0)

    // 上1秒的_lastSecondBytes有数据 就直接返回
    // 这个巧妙的是 感觉不是准确的1s 但是又是准确的 因为如果是超过1秒就不继续添加了 1秒内的就添加进去了。

    // 如果上一秒有数据则返回
    if (this._lastSecondBytes !== 0) {
      return this._lastSecondBytes / 1024
    } else {
      // 如果上一秒的速度是0,并且距离上次计算超过了500ms 则用_intervalBytes和durationSeconds进行计算
      if (this._now() - this._lastCheckpoint >= 500) {
        // if time interval since last checkpoint has exceeded 500ms
        // the speed is nearly accurate
        return this.currentKBps
      } else {
        // We don't know
        return 0
      }
    }
  }
下面是addBytes方法,根据本次调用的时间和上一次计算时间的差值做不同处理,具体参见代码注释,这种计算的思路是挺巧妙的,开始以为不准切,但是仔细思考是能准确计算最近有数据一秒的网速。一直强调是最近有数据一秒的网速而不是上一秒的网速。
addBytes (bytes) {
    // 如果是第一次调用则 记录_firstCheckpoint _lastCheckpoint
    if (this._firstCheckpoint === 0) {
      this._firstCheckpoint = this._now()
      this._lastCheckpoint = this._firstCheckpoint
      this._intervalBytes += bytes
      this._totalBytes += bytes
    } else if (this._now() - this._lastCheckpoint < 1000) {
      // 小于1s 就添加 _intervalBytes
      this._intervalBytes += bytes
      this._totalBytes += bytes
    } else { // duration >= 1000

      // 只有大于1秒的时候才计算_lastSecondBytes
      // 就是这1s内的_intervalBytes
      this._lastSecondBytes = this._intervalBytes

      this._intervalBytes = bytes // 并且重新开始计算_intervalBytes 大于1秒的这次数据算在下1秒

      this._totalBytes += bytes
      this._lastCheckpoint = this._now()
    }
}
下面是currentKBps getter属性,在lastSecondKBps中只有当超过因为如果durationSeconds大于0.5时才使用currentKBps属性,因为如果durationSeconds过小,会过大估计了网速。
get currentKBps () {
    this.addBytes(0)

    let durationSeconds = (this._now() - this._lastCheckpoint) / 1000
    if (durationSeconds == 0) durationSeconds = 1
    return (this._intervalBytes / durationSeconds) / 1024
  }
平均网速averageKBps, 如果中途出现网络中断或者暂停的情况会拉低平均网速。
get averageKBps () {
    let durationSeconds = (this._now() - this._firstCheckpoint) / 1000
    return (this._totalBytes / durationSeconds) / 1024
 }
这里讲的缓存是指使用loader获取数据后到传给FLVDemuxer过程中的缓存。这个过程中为什么需要缓存呢?因为FLV格式数据的解封是以TAG为单位,而过来的数据是流式的字节,不可能每次是完整的TAG,所以FLVDemuxer每次只处理当前数据中完整的TAG,没有处理的部分就缓存起来,和下次获取的数据拼接。
通过上面的原理介绍,你应该可以猜到这个过程是放在IOController中,我们先分解缓存中使用到的几个关键API和操作方法。
ArrayBuffer 对象用来表示通用的、固定长度的原始二进制数据缓冲区。你不能直接操作 ArrayBuffer 的内容,而是要通过类型数组对象或 DataView 对象来操作,它们会将缓冲区中的数据表示为特定的格式,并通过这些格式来读写缓冲区的内容。
这里的定义 关键有两点,一是ArrayBuffer是固定长度,所以扩展的话需要创建新的然后把数据复制过去,而是不能直接操作,二是 不能直接操作,需要用类型数据对象,我们这里用Uint8Array,因为8位无符号正好是以一个字节为单位。我们这里对缓存的处理,暂时不需要读取指定的字节,目前只需要能够读取指定位置的数据即可。
Uint8Array 数组类型表示一个8位无符号整型数组,创建时内容被初始化为0。创建完后,可以以对象的方式或使用数组下标索引的方式引用数组中的元素。
new Uint8Array(buffer [, byteOffset [, length]]);
说明:在ArrayBuffer上创建Uint8Array对象,使缓存区可操作。参数: buffer为ArrayBuffer对象,byteOffset指定ArrayBuffer的起始字节数,length指定创建的长度。

typedarray.set(typedarray[, offset])说明:Uint8Array属于typedarray, set方法可以从指定类型化数据中读取值,并将其存储在类型化数组中的指定位置。参数:typedarray是指要拷贝的源数据,offset指拷贝到目标数据的起始位置。
根据上面的api,把长度为100的ArrayBuffer扩展为长度为1000的ArrabyBuffer。
const oldbuffer = new ArrayBuffer(100);
const u1 = new Uint8Array(oldbuffer, 0);
const newbuffer = new ArrayBuffer(1000);
const u2 = new Uint8Array(newbuffer,0);
u2.set(u1,0);
记录缓存消费位置,消费一部分后重新设置缓存。
let stashUsed = 100;
let bufferSize = 1024;
let stashBuffer = new ArrayBuffer(1024);

// 消费数据 返回消费的字节数

let consumed = dispatchChunks(stashBuffer.slice(0, stashUsed),stashUsed);
let allBuffer = new Uint8Array(stashBuffer, 0, bufferSize);
let remainBuffer = new Uint8Array(stashBuffer, consumed);
allBuffer.set(remainBuffer,0);
stashUsed = stashUsed-consumed;
下面就来看IOController中缓存数据的代码。几个变量和方法的含义:
this._stashBuffer  ArrayBuffer类型   存放数据的缓存区
this._bufferSize  缓存区的大小 this._stashBuffer的长度
this._stashUsed   缓存区中使用的缓存大小
this._stashByteStart 已经消费的部分在整个流中的开始位置
this._expandBuffer() 扩展缓存的方法
this.this._dispatchChunks() 消费缓存数据的方法 返回消费的数量
chunk ajax获取的二进制数据
有了上面的准备,就可以直接看缓存处理的代码了
// 缓存中没有数据的情况
if (this._stashUsed === 0) {
    // 直接消费
    let consumed = this._dispatchChunks(chunk, byteStart);
    // 如果有剩余
    if (consumed < chunk.byteLength) {
        // 未处理的数据长度
        let remain = chunk.byteLength - consumed;
        // 如果数据超过缓存 则扩展缓存
        if (remain > this._bufferSize) {
            this._expandBuffer(remain);
        }
        // 在_stashBuffer上创建 Uint8Array使其可以操作
        let stashArray = new Uint8Array(this._stashBuffer, 0, this._bufferSize);
        // 从chunk的 consumed开始获取数据 然后从第0位置开始写入stashArray中
        stashArray.set(new Uint8Array(chunk, consumed), 0);
        // 记录stashUsed的大小
        this._stashUsed += remain;
        // 记录整个流中的开始位置
        this._stashByteStart = byteStart + consumed;
    }
} else {
    // 缓存中有数据的情况
    // 先扩展缓存 能够放下已存在的和当前获取的
    if (this._stashUsed + chunk.byteLength > this._bufferSize) {
        this._expandBuffer(this._stashUsed + chunk.byteLength);
    }
    let stashArray = new Uint8Array(this._stashBuffer, 0, this._bufferSize);
    // 先把获取到的chunk 放入缓存中 从_stashUsed的offset开始存放
    stashArray.set(new Uint8Array(chunk), this._stashUsed);
    // 重置_stashUsed
    this._stashUsed += chunk.byteLength;
    // 把缓存中的数据全部读出进行消费
    let consumed = this._dispatchChunks(this._stashBuffer.slice(0, this._stashUsed), this._stashByteStart);
    // 如果消费了有剩余
    if (consumed < this._stashUsed && consumed > 0) {  // unconsumed data remain
        // 从consumed开始截取数据
        let remainArray = new Uint8Array(this._stashBuffer, consumed);
        // 从0开始设置 剩下的数据作为缓存 并且改变_stashUsed 记录缓存的位置
        stashArray.set(remainArray, 0);
    }
    // 重新设置_stashUsed
    this._stashUsed -= consumed;
    this._stashByteStart += consumed;
}
上面的代码是每次来数据都会调用this._dispatchChunks进行消费操作,其实还有一种处理情况,通过变量this._enableStash控制,上面的情况是this._enableStash为false。如果为true的话区别是只有缓存的数据达到this._stashSize大小时,才会触发this._dispatchChunks进行消费操作。
总体的流程是如果数据小于this._stashSize 则往缓存中添加,如果大于继续下面的判断如果缓存中没有数据 则直接消费本地来的数据,如果有数据则消费缓存中的数据 消费之后再把本地来的数据放入缓存。具体参见代码
if (this._stashUsed === 0 && this._stashByteStart === 0) {  // seeked? or init chunk?
    // This is the first chunk after seek action
    this._stashByteStart = byteStart;
}
// 不满_stashSize 就会先往缓存中存放 _stashSize会动态调整
if (this._stashUsed + chunk.byteLength <= this._stashSize) {
    let stashArray = new Uint8Array(this._stashBuffer, 0, this._stashSize);
    stashArray.set(new Uint8Array(chunk), this._stashUsed);
    this._stashUsed += chunk.byteLength;
} else {  // stashUsed + chunkSize > stashSize, size limit exceeded
    let stashArray = new Uint8Array(this._stashBuffer, 0, this._bufferSize);
    if (this._stashUsed > 0) {  // There're stash datas in buffer
        // 如果有缓存 先消费缓存中的数据
        let buffer = this._stashBuffer.slice(0, this._stashUsed);
        let consumed = this._dispatchChunks(buffer, this._stashByteStart);
        if (consumed < buffer.byteLength) {
            if (consumed > 0) {
                let remainArray = new Uint8Array(buffer, consumed);
                stashArray.set(remainArray, 0);
                this._stashUsed = remainArray.byteLength;
                this._stashByteStart += consumed;
            }
        } else {
            this._stashUsed = 0;
            this._stashByteStart += consumed;
        }
        // 消费完缓存中的数据之后,然后再把这次过来的chunk放入缓存中
        if (this._stashUsed + chunk.byteLength > this._bufferSize) {
            this._expandBuffer(this._stashUsed + chunk.byteLength);
            stashArray = new Uint8Array(this._stashBuffer, 0, this._bufferSize);
        }
        stashArray.set(new Uint8Array(chunk), this._stashUsed);
        this._stashUsed += chunk.byteLength;
    } else {  // stash buffer empty, but chunkSize > stashSize (oh, holy shit)
        // dispatch chunk directly and stash remain data
        // 如果缓存中没有数据 直接消费本次来的数据
        let consumed = this._dispatchChunks(chunk, byteStart);
        if (consumed < chunk.byteLength) {
            let remain = chunk.byteLength - consumed;
            if (remain > this._bufferSize) {
                this._expandBuffer(remain);
                stashArray = new Uint8Array(this._stashBuffer, 0, this._bufferSize);
            }
            stashArray.set(new Uint8Array(chunk, consumed), 0);
            this._stashUsed += remain;
            this._stashByteStart = byteStart + consumed;
        }
    }
}
关于this._stashSize还有两个问题,一是this._stashSize的大小会根据网速进行调整,二是this._stashSize是小于等于this._bufferSize缓存大小,所以this._stashSize变化时也需要扩展缓存。
// 先看获取网速的代码。
//网速计算
this._speedSampler.addBytes(chunk.byteLength);

// adjust stash buffer size according to network speed dynamically
// 获取当前网速
let KBps = this._speedSampler.lastSecondKBps;
if (KBps !== 0) {
  // 正规化网速
  let normalized = this._normalizeSpeed(KBps);
  if (this._speedNormalized !== normalized) {
      this._speedNormalized = normalized;
      this._adjustStashSize(normalized);
  }
}
其中的_normalizeSpeed方法是在给定的速度中二分查找最接近网速的大小。
this._speedNormalizeList = [64, 128, 256, 384, 512, 768, 1024, 1536, 2048, 3072, 4096];
_normalizeSpeed(input) {
    let list = this._speedNormalizeList;
    let last = list.length - 1;
    let mid = 0;
    let lbound = 0;
    let ubound = last;
    if (input < list[0]) {
        return list[0];
    }
    // binary search
    while (lbound <= ubound) {
        mid = lbound + Math.floor((ubound - lbound) / 2);
        if (mid === last || (input >= list[mid] && input < list[mid + 1])) {
            return list[mid];
        } else if (list[mid] < input) {
            lbound = mid + 1;
        } else {
            ubound = mid - 1;
        }
    }
}
_adjustStashSize是调整this._stashSize的方法,当缓存的大小小于this._stashSize时,则进行扩展。
_adjustStashSize(normalized) {
    let stashSizeKB = 0;
    // 如果是直播
    if (this._config.isLive) {
        // live stream: always use single normalized speed for size of stashSizeKB
        stashSizeKB = normalized;
    } else {
        if (normalized < 512) {
            stashSizeKB = normalized;
        } else if (normalized >= 512 && normalized <= 1024) {
            stashSizeKB = Math.floor(normalized * 1.5);
        } else {
            stashSizeKB = normalized * 2;
        }
    }
    // 最大是8K
    if (stashSizeKB > 8192) {
        stashSizeKB = 8192;
    }
    let bufferSize = stashSizeKB * 1024 + 1024 * 1024 * 1;  // stashSize + 1MB
    // 如果缓存小则扩展缓存
    if (this._bufferSize < bufferSize) {
        this._expandBuffer(bufferSize);
    }
    this._stashSize = stashSizeKB * 1024;
}
扩展缓存的_expandBuffer方法和我们写的demo很相似。
_expandBuffer(expectedBytes) {
    let bufferNewSize = this._stashSize;
    // 每次*2 直到大于expectedBytes
    while (bufferNewSize + 1024 * 1024 * 1 < expectedBytes) {
        bufferNewSize *= 2;
    }

    bufferNewSize += 1024 * 1024 * 1;  // bufferSize = stashSize + 1MB
    if (bufferNewSize === this._bufferSize) {
        return;
    }
    // 新的缓存区
    let newBuffer = new ArrayBuffer(bufferNewSize);
    // 旧缓存区有数据 则进行拷贝
    if (this._stashUsed > 0) {  // copy existing data into new buffer
        let stashOldArray = new Uint8Array(this._stashBuffer, 0, this._stashUsed);
        let stashNewArray = new Uint8Array(newBuffer, 0, bufferNewSize);
        stashNewArray.set(stashOldArray, 0);
    }
    // 重设缓存区和缓存区大小
    this._stashBuffer = newBuffer;
    this._bufferSize = bufferNewSize;
}